Showing posts with label food. Show all posts

Tuesday, June 10, 2014

Snickerdoodle Cupcakes

Whenever I pick a dessert recipe, I tend to lean towards chocolate.  You can't go wrong with chocolate!  Every now and then, I'll crave something without chocolate. Crazy, right?  These snickerdoodle cupcakes are perfect for a non-chocolate dessert that still has PLENTY of sweetness!  These were one of two flavors of cupcakes I made for Carson's second birthday party!


What You Need for the CUPCAKES:
1-2/3 cups all purpose flour
1/2 tsp. baking powder
1/4 tsp. baking soda
1/2 tsp. salt
1/2 cup unsalted butter, melted
1-1/2 cups granulated sugar, divided
1 large egg (I use Egg Beaters)
1/4 cup plain yogurt
3/4 cup milk (I used Lactaid)
1 Tbsp. vanilla extract
2 tsp. ground cinnamon

How to Make the CUPCAKES:
  1. Preheat oven to 350 degrees.  Line muffin tin with cupcake liners and set aside.  (Note: This recipe makes about 12-14 cupcakes.)
  2. In a medium bowl, mix together the flour, baking powder, baking soda, and salt.  Set aside.
  3. In the bowl of your stand mixer, use your whisk attachment to mix your melted butter and 1 cup of the sugar.  Whisk in egg, yogurt, milk, and vanilla extract until combined.
  4. Slowly mix in your dry ingredients a little at a time until no lumps remain.
  5. In a small bowl, mix the remaining 1/2 cup of sugar and cinnamon.  Set aside.
  6. Spoon about 2 tablespoons of batter into each muffin cup.  Top each with 1 tsp. of the cinnamon-sugar mixture.  (It seems like a lot, but don't worry!)  Top with another heaping tablesppon of batter.  Your wells should be about 3/4 full.  Top each cupcake with another teaspoon of the cinnamon sugar mixture.
  7. Bake for 19-21 minutes or until a toothpick comes out clean when inserted into the center of the cupcake.  Cool completely before frosting.
What You Need for the FROSTING:
1 cup butter, softened
4 cups powdered sugar
3-4 Tbsp. milk (I used Lactaid)
1 tsp. vanilla extract
1-1/2 tsp. ground cinnamon

How to Make the FROSTING:
  1. Beat butter until light and fluffy.  Add sugar a half cup at a time until completely incorporated.  
  2. Add up to 4 tablespoons of milk if the frosting gets too thick.
  3. Add vanilla and cinnamon, beating just until combined.
  4. Pipe your buttercream onto your cupcakes!
*Note: I had tons of leftover frosting.  I'm not sure if a half batch of the frosting would cover your cupcakes, but I used my leftover frosting to eat with graham crackers - delicious!


I got fancy with my frosting this time and I'm not going to lie, I was pretty proud.  :)

Original recipe can be found here.


Photobucket

Friday, February 14, 2014

Sweets for your Sweetie!

Happy Valentine's Day!

Here's a little flashback from last year:


THE GOOD LIFE BLOG

Today I'm sharing 5 fun and easy Valentine's treat ideas.  These treats are super simple and easy to make for your sweetie!

{one} Red Velvet Puppy Chow.  Need I say more?!  Find the recipe here.


{two} Valentine pretzel "buttons" with Hershey Hugs or Dove chocolates.  YUM!
**To make: Preheat oven to 175 degrees.  Arrange pretzels on baking sheet.  Add a Hug or Dove chocolate to the top of each pretzel.  Pop in the oven for 2-3 minutes until candy is shiny.  Remove from oven and press an M&M on top of each pretzel "button".  Allow to cool.


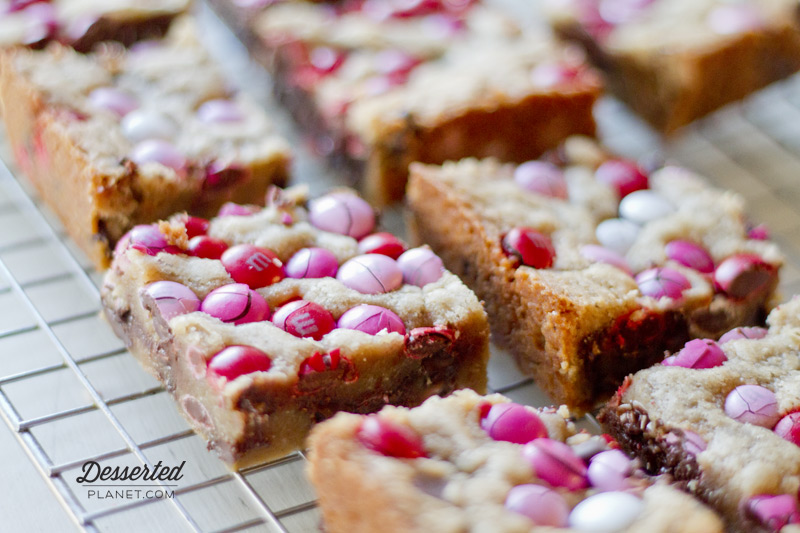
{three} Valentine M&M cookie bars.  Use my favorite recipe and add in some Valentine colored M&M's.  Festive and delicious!


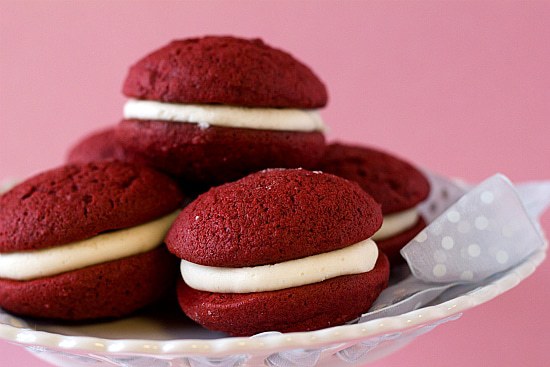
{four} Whoopie Pies!  I love making these because they are so simple and SO delicious.  I love red velvet with a fluffy white filling.  Another idea is to do chocolate with a pink filling (could be strawberry or just white icing with food coloring).
**To make: Use this simple recipe for cake mix cookies.  Allow cookies to completely cool.  Frost the bottom of one cookie and add another cookie to create the sandwich.  Easy peasy!


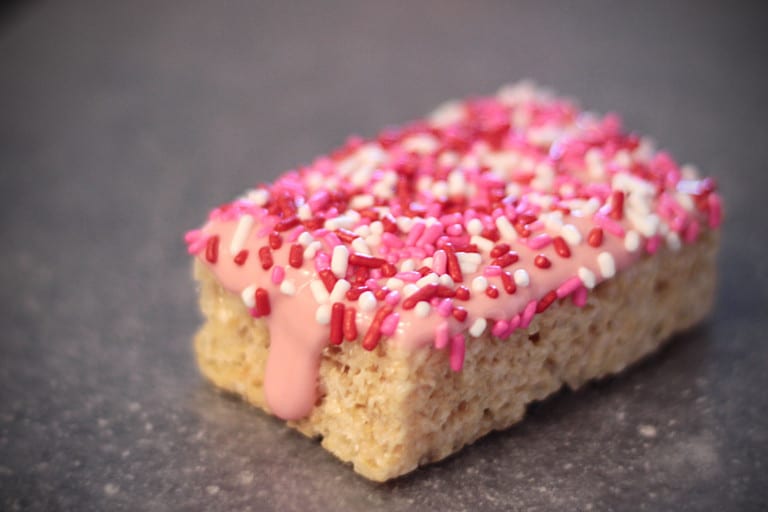
{five} Valentine Rice Krispie Treats.  So easy and so addicting.  Find the process here.


What is your favorite dessert to make for your sweetie?  
I'm planning on making something red velvet!

Photobucket

Friday, January 31, 2014

My 5 Fav Kitchen Gadgets

I'm linking up to share 5 things on this fabulous Friday!
Today I'm sharing 5 of my favorite kitchen gadgets.  Now that we're getting ready to move, I'm really excited to get some of my things out of "storage" since we don't have to have totally bare counters for showings!  We packed a lot away when we put our house on the market.  A lot of times when I want to use something I'll realize it's packed away or I have to get it back out from a hiding spot (like a shelf in our laundry room)!

Here are 5 things that I couldn't live without in my kitchen.  (Click the links or photos to get more info!)

{one} My stand mixer!  I don't have a fancy Kitchenaid like most of you, but I LOVE my Hamilton Beach!  I asked for a Kitchenaid and my wonderfully frugal husband did a lot of research and found that this mixer had great reviews and was very similar.  I love using it for all of my baking and I've also used it for cooking.  Did you know you can shred chicken in about 2 seconds in your stand mixer?!  Also, mine is black.  :)
  

{two} My Keurig.  Can you believe I used to have an old school coffee pot with FILTERS?!  Haha!  Seriously though, I love my Keurig for my hot beverages like coffee, mochas, and hot chocolate.  I even use the hot water to make things like oatmeal for Carson!  I also love using the reusable K-Cup because it saves a little money and if you can't find a certain flavor in k-cups, you can make your own!


{three} In case you haven't noticed, I bake a lot of cookies.  I love using my cookie scoop for this!  It's such a simple little gadget, but it saves so much time and it makes your cookies nice and uniform!

{four} I love my Silpat Non-Stick Baking Mat for baking and cooking!  I used to always use parchment paper but now I'm addicted to my Silpat.  I used parchment paper for two reasons: 1.) less cleaning afterwards and 2.) it seemed to help my baked goods from flattening.  I got one Silpat for Christmas from my sister and I am already itching to buy more for my other baking sheets.  Hopefully I can hold off until my birthday!

{five} I really love my silicone steamer for steaming veggies.  I never had a steaming basket before this so I can't compare to metal, but this is so easy to clean and super easy to store!  I went with silicone because I can't stand the sound of metal against metal so I couldn't imagine using a metal steamer basket.  I prefer my veggies steamed and this makes the process quick and easy!


There are other things in my kitchen that I obviously couldn't live without, but these are 5 of my favs.
What are your favorite kitchen gadgets?

Photobucket

Tuesday, November 12, 2013

Easy Potato Soup [Tasty Tuesday]

Now that the weather is getting frigid cold in Ohio, I figured it was time for some soup!  If it were up to me, I would eat soup all year.  My husband tends to disagree.  This potato soup is super easy and perfect for chilly days!  My husband always insists he needs something to go with his soup in order to feel full.  With this soup, he was totally satisfied!  The only meat was the minimal turkey bacon topping.  I consider that a success in this house!


What You Need:
1 bag frozen diced hash brown potatoes
1/2 large onion, diced
1 quart chicken broth (I used reduced sodium)
3 cloves garlic, minced
1/4 cup butter
2 1/2 tsp. salt
1 tsp. pepper
1 cup half & half cream
1 cup shredded cheddar cheese + extra for topping
6-8 slices of bacon, crumbled for topping (I used turkey bacon)
green onion, diced for topping

How to Make:
  • Combine the first 7 ingredients in your crock pot.  Cover and cook on LOW for 8 hours.  (Alternative: cook on HIGH for 4 hours.)  I like to use these to make for an easier clean-up!
  • Using a potato masher, mash mixture until potatoes are coarsely chopped and soup is thickened to your liking.  I like to leave some chunks of potatoes!
  • Stir in half & half and shredded cheese.
  • Serve with optional toppings for your dinner guests: shredded cheddar, crumbled bacon, and chives.


**This recipe is modified from a recipe found on cdkitchen.com.


Photobucket

Monday, October 28, 2013

Who Invents This Stuff?!

Every year for Christmas my step mom buys everyone something silly and fun.  Usually it's some sort of little game or something unique that you probably haven't seen before.  Last year we got pig poppers and Toastabags.  That's right, toasta.  Not toaster!  :)

We had a pig popper war with my family on Christmas and I think after that, sadly, the pigs have lived in our basement.  Sad life for them!  Toastabags have been in one of my kitchen drawers next to my foil, plastic wrap, parchment paper, baggies, etc.  To be honest, I almost threw them out a few times thinking they were silly but I felt too guilty throwing away a gift.

Finally (almost 10 months later), I decided to test them.  You guys, they are SO cool!

I used my Toastabags to make Carson's (FIRST EVER) grilled cheese.  This is going to get difficult, so pay attention....

1. Assemble your sandwich and insert into your Toastabags . 
2. Insert Toastabags into your toaster. 
3. Enjoy your warm and toasty sandwich!


Seriously, it's that easy!

I was a little skeptical but these things really work!  The cool part is that they're washable (even dishwasher safe) and you can re-use them up to 100 times!  I know grilled cheese is super easy to make but this allows me to have NO dirty dishes!  Bonus.  :)

Here is a close-up of how my grilled cheese turned out.  The left side of the bread isn't toasted as well because the type of bread I buy has larger slices and only fits one way into our toaster.  It doesn't fully toast outside of the Toastabags either.


Carson definitely approves!


Get your own set of Toastabags here:


Note: I was not compensated in any way for this post.  These are all my honest, personal opinions!  

Photobucket

Tuesday, September 24, 2013

Pizza Sliders [Tasty Tuesday]

If you know me, you know I love anything to do with pizza.  I've made all kinds of variations of pizza - pizza muffins, pizza braid, pizza balls, pizza roll-ups, etc.  I just can't get enough!  When I saw Pizza Sliders on Pinterest, I knew I had to try them!


What You Need...For the sandwiches:
9 slider rolls
3/4 cup pizza sauce
25-30 slices pepperoni (I did 3 per sandwich)
3/4 cup shredded mozzarella cheese

...For the topping:
3 tablespoons unsalted butter, melted
1/2 tablespoon onion powder
1/2 tablespoon garlic powder
1/2 tablespoon Italian seasoning
1/4 teaspoon Worcestershire sauce

How to Make
Preheat the oven to 350 degrees.

Separate each roll, then spread a little pizza sauce onto both halves. Place 3 slices of pepperoni and a handful of shredded cheese on each roll. Close rolls and place them close together in a 9x9" baking dish.  I lined my dish with aluminum foil for an easy clean-up!


In a small bowl, whisk together all of the sauce ingredients. Brush evenly over all of the sandwiches, just enough to cover the tops; let sandwiches sit for 10 minutes to absorb the butter and seasonings. 


Cover with foil and bake for 15 minutes or until cheese is melted. Uncover and cook for 5 additional minutes or until tops are slightly brown and crispy. Serve warm.

You can actually prep these a day ahead of time and keep them in the fridge until they're ready to be baked!  

Photobucket