Showing posts with label halloween. Show all posts

Thursday, October 31, 2013

Foam Fun for Tots in the Tub!

*-*Happy Halloween!*-*  

Today I'm sharing a simple little craft you can make for your kids.  But first, here's a sneak peak of Carson's Halloween costume.  Hopefully I'll have some more pictures to share after trick or treat tonight!


I originally saw this idea here and thought it was so cute!  Not only is this a fun activity, it's CHEAP!  I bought more foam than I needed for less than $2.  

What You Need:
2 sheets of foam, orange & black (I bought the 12x18 size at Michael's)
scissors
*optional: pencil

How to Make:
First cut out your pumpkin.  You can do this by eye or you can lightly sketch a pumpkin onto the foam with a pencil.
Next, cut your jack-o-lantern face shapes.  I did a Google image search for "jack-o-lantern" faces and just borrowed a few of those ideas.  (That's how not creative I was that day, ha!)  Make sure to make plenty of options for eyes, nose, and mouth!
Finally, get the shapes wet and let your toddler create a masterpiece!


Photobucket

Tuesday, October 29, 2013

Frankenstein Footprint Craft

I love doing little crafts during the holidays with Carson so that a.) I can save them and b.) I can use them for festive holiday decor!

This is what I did last year for October:


I wanted to do something a little different this year but I was hoping to find a footprint craft so I could compare the size of his prints!  I saw this Frankenstein idea on Pinterest and I thought it was too cute!


This craft is pretty self-explanatory, but in case you are intimidated, here are some step by steps! :)

What You Need:
white paper (I used a piece of cardstock)
green paint (I just used an acrylic I already had)
paint brush or foam brush
black marker
"googly" eyes or white paint
wipes or wet paper towel for clean-up!
*Optional: ribbon & glue/tape for embellishment

How to Make:

  1. Get your paper ready and do a few test footprints without paint.  I put Carson in his highchair with a snack and put the paper on a clipboard so I would have a hard surface under it.
  2. Paint the bottom of your child's foot (one at a time!) with the green paint.  Just a thin layer will suffice but make sure to get the entire foot and the toes!
  3. Bring the paper to your child's foot and press the foot onto the paper.  Make sure to gently press on each of the toes to get a good print!
  4. Clean your cutie's foot and repeat steps 2-3 with the other foot!
  5. Once your child's prints have dried, you can add any embellishments you want.  I used a sharpie for the "screws" and stitched mouths.  For the eyes I just glued on some gooly eyes I had but you could also do some white paint with a black dot in the center.
  6. Optional: Title your masterpiece!  I typed mine up on the computer in a creepy font and then mounted it and embellished with some coordinating ribbon.  
Have fun!  Make sure to share your craft with me if you try this!


I'm linking up with Kristin today!


Photobucket

Tuesday, October 22, 2013

Picasso Pumpkin {Easy Toddler Craft}


I love doing crafts with Carson and I really love doing crafts that I can save for years to come!  Holiday arts and crafts are fun because you can get them back out and use as a little decoration each year!

This craft is SUPER easy and SUPER cheap.  A+, right?

What You Need
Orange paper (I used scrapbook paper I had in my stash.  You could also have your tot finger paint or water color some white paper orange!)
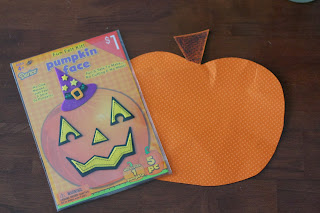
Jack-o-lantern stickers (or you can make your own!) - I found mine for $1 at Walmart.


How to Make
1.  Cut your paper into the shape of a pumpkin (don't forget the stem).  I colored the stem brown with a marker.
2. Give your toddler the stickers to place on the pumpkin.  I suggest giving one sticker at a time! :)
Tip: Since Carson was only 17 months during this project, I pointed in a general direction on the pumpkin to give him an idea of where to place each sticker.  He followed my directions pretty good except for one eye....which is what makes it a Picasso pumpkin!


Use any extra stickers as accessories!  Carson is STILL carrying around this witch hat days after we completed our project. :)


Photobucket

Tuesday, October 8, 2013

Spooky Color Matching Busy Bag

I made this little game for Carson and 4 other tots in my mommy group.  We decided to do a busy bag exchange and the only "rule" was that it should have something to do with fall.  I searched and searched on Pinterest and finally found a game that was cheap to make and age appropriate for 16-17 month old toddlers!  This is where I found the craft.  They have TONS of other great ideas as well!


What You Need
5 clothespins
white cardstock
watercolors or markers
Ziploc bag
*optional: cardboard

How to Make
First you will want to prep your clothespins.  I used watercolors, but you can also color them with markers.  You will need the following 5 colors: red, orange, yellow, green, blue, and purple.  You might have seen my post on my instagram last week when I was starting this craft.

Next you'll want to print your color wheels on cardstock.  You can find the original printable on the Three Ghost Friends site.  If you choose, you can mount your wheel to an even thicker cardboard.  I chose to do this to make the wheels sturdy for little toddler hands!

Finally, stick all of your items in a ziploc baggie so you don't lose any parts!  Your busy bag is now complete!  I like this busy bag because it helps teach colors and helps your little one develop their motor skills and coordination by pinching those clothespins!


I'm linking up with Kristin today!


Photobucket