Showing posts with label craft. Show all posts

Friday, May 9, 2014

Easy Mother's Day Craft

I promise I'll get back to blogging soon.  I have a list of post ideas and I just need to take the time to sit down and work on them!  Does anyone know where I can get some extra time to do that?!

Anyway, I wanted to share a quick and easy Mother's Day craft idea.  My mom and mother-in-law love getting little "handmade" gifts from Carson so I knew I wanted to include Mason this time!  I had to do something easy since he's only 3 weeks so I decided on foot prints.  I based this off a picture I saw on Pinterest and made a few modifications.

For the foot prints I used 3 colors on Carson and then one on Mason.  Carson loves it and says "tickle!" the whole time.  Mason was not a fan of the cold paint....poor guy!

It's not perfect but it was made with love! :)


Photobucket

Thursday, April 17, 2014

"Tie-Dye" Painting Craft

My original inspiration for this craft was found on Pinterest (
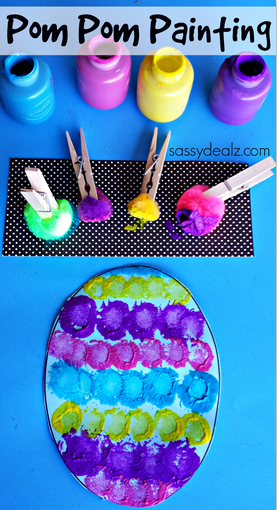
see original post here).  I knew Carson wasn't going to make straight lines like the pin I saw, but I liked the process.  Here's a look at what they did:

I didn't want to buy anything for this craft so I decided to use cotton balls instead of pom poms.  I'm not sure if it was Carson's artistic creativity or the cotton balls, but our egg came out looking tie-dyed which I LOVE!  Carson had so much fun making this, too!


What You Need:
-Paints (I let Carson choose 4 colors)
-Cotton balls & clothespins (you'll need one set for each paint color)
-Paper plate to use as a "palette"
-Egg template (I just found mine on Google images, you could also just sketch one out)

How to Make:
1. Clip a cotton ball onto each clothespin.
2. Squirt a little of each color paint onto your fancy paper plate artist's palette.
3. Depending on your child's age, you can give them all of the clips at once, or choose one at a time.  I let Carson explore a clothespin with no paint first because I knew he'd put it all over his body.  Once he was ready, I gave him one color to start "making dots" and eventually he used two at a time.  Like I said, use your own judgment!
4. Once your child is satisfied with their egg, set it aside and let it dry.
[Optional]: I cut out Carson's egg and glued it to a background with his name, date, and a Happy Easter message.  Do whatever you want with yours!

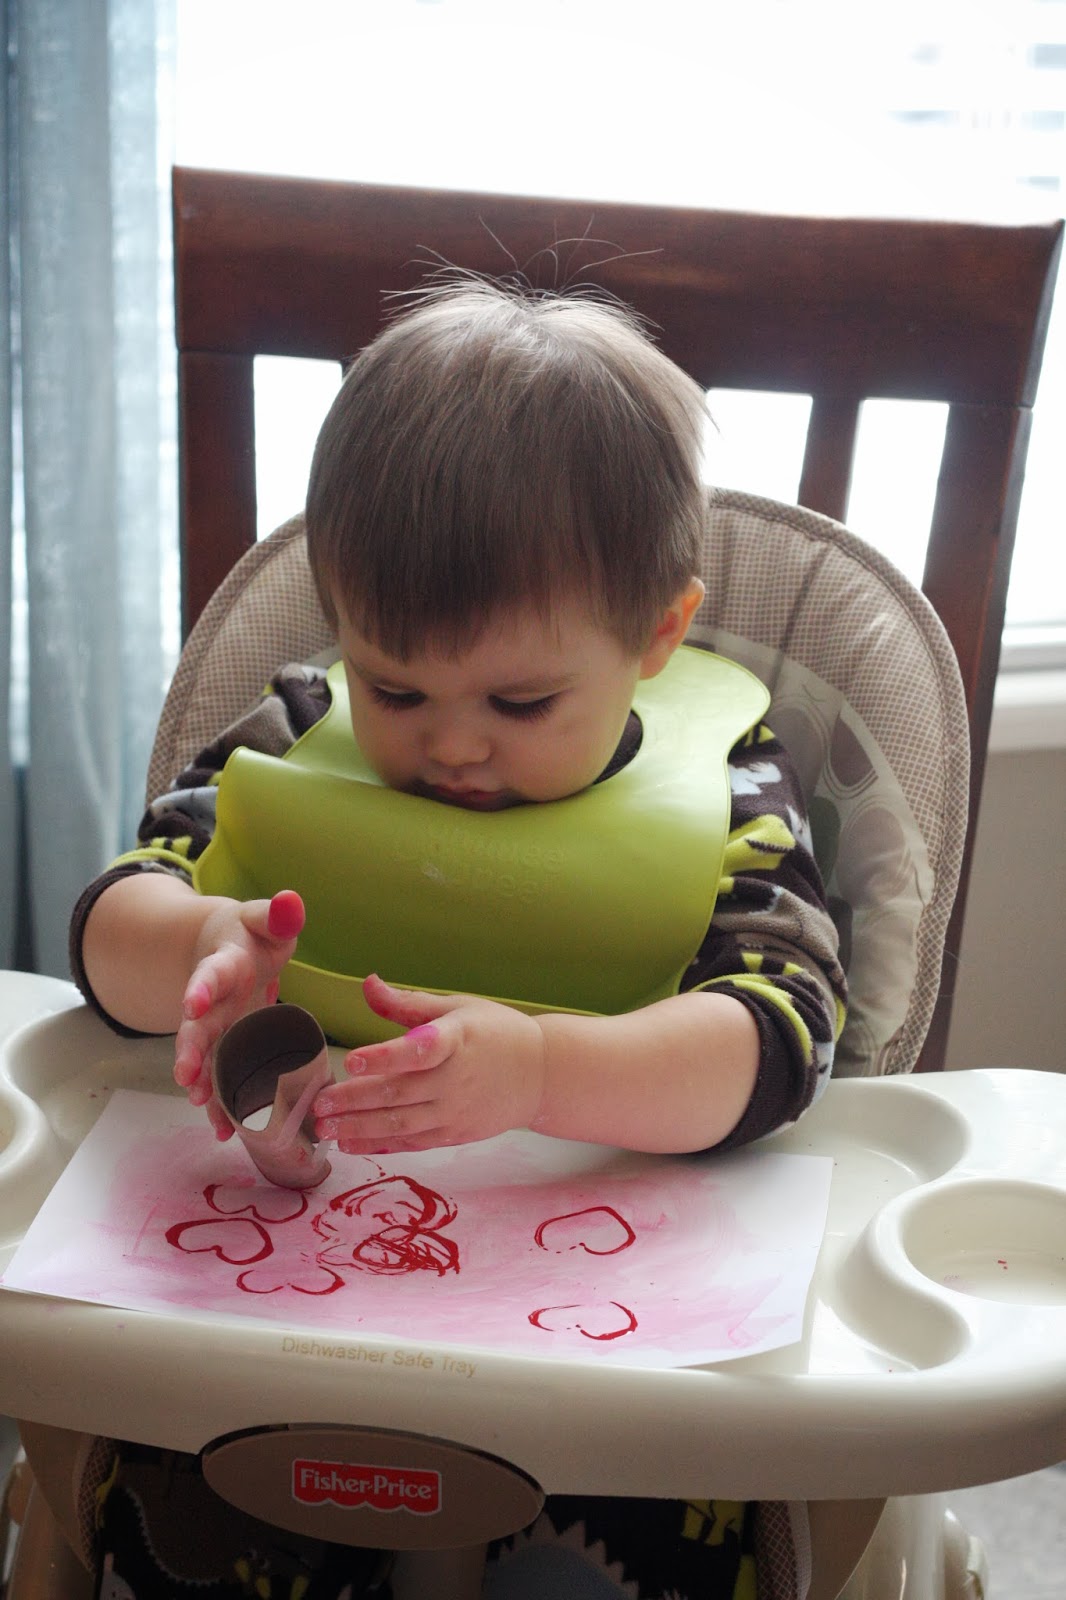
Here are some pictures of Carson creating his masterpiece:

The cotton balls started to fall apart and he didn't like the "fuzzies"! :)


Photobucket

Wednesday, April 16, 2014

Toddler Hand Print Easter Craft

For Easter I knew I wanted to do some painting crafts because Carson is SO into coloring and painting right now!  At the same time, he's a super wiggly 22 month old so I wanted to keep it fairly simple.

What You Need:
-white paint + paintbrush
-pink paint (or marker)
-black marker
-pastel paper

How to Make:
1. Before putting paint on your child's hand, make sure to have your paper near and ready.  Carson wanted to make a fist the whole time so this took a few tries!  Paint your child's palm and two fingers.  I chose to paint Carson's index finger and pinky.  Once the hand is painted, don't waste any time and get that print on the paper!
2. Once the hand print dries, you can add the nose, mouth, whiskers, and eyes.  I used pink paint for the nose and sharpie for everything else.

Easy peasy!  Here are a few that we gave as little cards:


Here's a look at the hand print craft we did for Easter last year:


Photobucket

Thursday, April 10, 2014

DIY Name Art {For the Nursery}

For the longest time I couldn't think of what I wanted to hang above Mason's crib.  I considered a wall decal, I considered a little flag bunting/banner, and I thought of other ideas.  I just kept coming back to name art.  Carson loves the name art we hung over his crib and loves to spell out his name with me.  I figured it would be a fun little thing to make for Mason, too!  I wanted to change it up this time so I made Mason's name art a little different than the way I made Carson's.  (Scroll down to see a picture of Carson's!)


What You Need
Wooden Letters
Paint, Paint Brush(es)
Canvas (I bought an 8x24 for a 5-letter name)
Fabric
Hot glue gun
Thumb Tacks**
Ribbon (optional)

How to Make

  1. First paint your wooden letters.  I chose a dark gray color called "Hippo Gray".  I painted the fronts of the letters first with a sponge brush and then went back and painted the sides with a smaller angled paintbrush.
  2. Iron your fabric and cut to size.  I bought an 8"x24" canvas and I purchased 1/3yd. of fabric.  
  3. Once your fabric is prepped, wrap your canvas.  Wrap the edges like you would wrap a gift and staple into place.
  4. Place your wooden letters on the canvas to plan your spacing.  Once you have them placed how you like, stick them on with some hot glue!
  5. Optional: If you want to add in another color, glue a piece of ribbon around the edge of the canvas to add some dimension.  I thought about doing this with navy blue ribbon but then decided I liked it without the ribbon.
**After using my hot glue gun to glue my letters onto the fabric covered canvas, I discovered they didn't seem very secure.  Because this will be hung over Mason's crib, I decided to secure them a little better.  I got some thumb tacks from my desk drawer and pushed them through the back of the canvas into the letters.  This really holds the letters in place with no chance of falling!


I bought all of my supplies at JoAnn's and the total cost of this project was under $15!  I used a 25% off total purchase coupon and bought the items while many of them were on sale.  

Here's a look at the name art I made a few years ago for Carson's nursery.  Similar, but different.  :)


Photobucket

Thursday, March 27, 2014

DIY Yarn Wrapped Letter

This was an easy project but very tedious...especially for perfectionists like myself!  Please note that my instructions are specifically for a letter 'M'.  If you do another letter, especially one with curves, your process will be a little different!


What You Need:
Yarn
Wooden letter
Tape or hot glue
Optional: paint to match your yarn

How to Make: (scroll down for step by step photos)

1. I was using a dark color of yarn so I decided to paint my letter to match the yarn.  This way if there was any space that was left uncovered, it would be less noticeable!  I spray painted my letter using this handy method.
2. Allow your letter to dry thoroughly.  Unfortunately my spray paint nozzle was faulty so my letter looks a little weird.  No worries though since it's just getting covered!
3. Once your letter is dry, you can start wrapping with yarn.  I wrapped vertically on the "legs" of the M first (see photo below).  To start wrapping I secured a piece of yarn with tape.  You can also use hot glue if you prefer.  When I was done wrapping a section, I would secure the end with tape again.
4. Once you have the legs wrapped vertically, get the edges on the top and bottom of each leg as well as the center "v" portion of your 'M'.
5. Now that you have your first layer, you're ready to start the second layer!  For this layer I wrapped horizontally.  I started at the bottom of each leg and moved up until I hit the corner by the "v".
6. After step 5 I was really intimidated.  I couldn't figure out how to get a first layer onto that middle "v" portion of my 'M'!  I decided to just do one layer there instead.  I started at the bottom of the "v' and wrapped horizontally.  After that I wrapped the upper right and left portions of the "legs" on my 'M' horizontally so that my yarn would have a uniform look.  I think it turned out great!  (Other than resembling the University of Michigan M, gross!)


Photobucket

Tuesday, February 25, 2014

Puffy Paint Polar Bear


What You Need:
  • Elmer's Glue
  • Shaving Cream (I just used the cheap Barbasol)
  • white paper
  • Optional: pink paper, black paper, googly eyes, black paint, glitter
How to Make:
  1. Prepare your "canvas" by cutting 3 circles: one large, 2 small.  Attach the two smaller circles on the top to create the polar bear's head and ears.
  2. Mix even amounts of glue and shaving cream to create your puffy paint.  I also added some glitter into my mixture, but it didn't end up being very visible once the paint dried.
  3. Give your child a paint brush and let them go to town painting their polar bear.  Carson loved the feeling of the puffy paint!
  4. Once the bear head is dry, you can add your embellishments.  I cut out little pink half circles for the ears and a black piece for the nose.  I also used googly eyes and added some black paint under the nose.  I attached all embellishments with the Elmer's glue I used for the project.  Carson loves feeling the bear now that it's dry, too!


Photobucket

Tuesday, February 11, 2014

Toddler Valentine Crafts

Recently Carson and I worked on some crafts for Valentine's Day.  You know I love a good keepsake and it was also a great opportunity to make some cards for our loved ones!

Carson was also pretty excited.  He loves painting!


For this first project, I cut out a heart template and used painter's tape to secure it to a piece of red paper.  Then I let Carson go to town with white paint and a little sponge roller!  [Scroll down to see pictures of the process.]


Carson used a custom heart stamper to create this masterpiece.  We used these instructions to make our super fancy heart stamp from a recycled toilet paper roll!  :)

Here are some pictures of Carson creating his masterpieces.  (We used scrap paper to cut out the brown hearts which he decorated with Bingo markers for his grandmas!)


I'm linking up with Kristin today!

Photobucket

Tuesday, January 21, 2014

Melted Snowman Craft {Toddler Painting}

I've been trying to do some sort of fun craft with Carson each month.  He loves the process and I love the keepsake!  :)  December was easy because I could do all kinds of fun Christmas-themed crafts.  January was a little trickier.  I searched for some cute winter themed ideas and LOVED the idea of creating a melted snowman.  Pinterest has a ton of variations and we made up our own.

Here is how it turned out:


What You Need:
  • piece of paper (something dark to help the white paint stand out)
  • white paint
  • paint brush (we used a foam brush)
  • small paper scraps for embellishments (scarf, hat, carrot nose, twig arms, etc.)
  • googly eyes
  • Optional: q-tip
How to Make It:
  1. I started by creating a "base" snowman...2 circles with the bottom being larger.  I then handed the reins to Carson.  I let him do whatever he want with his white paint and brush.  I thought he would cover the entire paper but he ended up keeping it toward the bottom, which actually made sense for a melted snowman!
  2. {Optional}: I gave Carson a q-tip that he dipped into white paint to add some "snowflakes" around his snowman.  He's used this painting method before and really liked it and I figured it would be a fun touch to the craft.
  3. Once the painting is dry, add your embellishments.  I used paper scraps to create tree twig arms, a carrot nose, and a top hat.  I also used an old scrap of ribbon to create a scarf and a pair of googly eyes to bring our snowman to life!

We also made a simple penguin footprint craft that I found on Pinterest.  It's fairly self explanatory but if you have any questions, send me an email!  


I'm linking up with Kristin today:   


Photobucket

Monday, December 23, 2013

Christmas Arts & Crafts for Toddlers

With Thanksgiving being so late this year, Christmas really came quickly!  I realized last week that the only Christmas craft I had done with Carson was our hand print Santa ornament!  {clickable link}

Last year I made this cute little reindeer foot print craft.  I love how it turned out, but I wanted to do something a little different this year.
{DIY instructions}
I checked Pinterest (where else?!) and found a lot of cute inspiration for some holiday crafts.  Here is what we came up with....

Hand Print Reindeer:
My husband already informed me how this is "incorrect" because Clarice has a black nose and no antlers.  Men!

Thumb Print Christmas Lights:


Photobucket

Tuesday, December 10, 2013

How-To: Salt Dough Ornaments

Last year I made some personalized DIY glitter ornaments to add to our tree.  {Click the link to find a how-to post!}

This year I wanted to make something with Carson.  I knew I wanted to include his hand print because I know how much fun it will be to compare his hand size in the years to come!  I saw this Santa hand print ornament idea on Pinterest and thought it was adorable!  Here's how ours turned out and a quick tutorial!


What You Need:
1/2 cup salt
1/2 cup plain flour
1/4 cup water
rolling pin
knife
paint (I used acrylic)
sealer (I used Mod Podge)
paint brushes
cookie sheet
parchment paper
*Optional: cookie cutters

How to Make:
-Preheat your oven to 200 degrees.
-Combine salt, flour, and water in a mixing bowl and knead until combined.  Your mixture should be a dough-like consistency.
-Roll out your dough just like you would when making sugar cookies (yum)!  I rolled mine to be about 1/4" thick.
-Take your child's hand help them gently press into the dough to create a hand print.  Don't press too hard or you will go through the dough!
-Using a sharp knife, cut around the hand print.  Leave a small border.
-Place your cut-out on a cookie sheet lined with parchment paper.
-Gather your dough scraps, roll it out again, and get as many hand prints as you can!  If you want, use a cookie cutter to make some other fun ornaments!
*This recipe made about 4 toddler-sized hand prints for me as well as one cookie cutter shape.

I also made one cookie cutter shape with some extra dough we had.  Carson used a foam brush to paint the tree and a Q-tip to add some ornaments!
After baking, before painting.


 Here is the original pin:


I'm linking up with Kristin:
Photobucket